I was scrolling through my feed, feeling that familiar pang of jealousy when someone posted a picture of a dessert that looked like it was plucked straight from a bakery window. My heart raced, my stomach growled, and I thought, “If they can have that, why can’t I?” The next thing I knew, I was in the kitchen, armed with a whisk, a handful of courage, and a secret stash of cocoa that I’d been saving for a rainy day. The air was already humming with the faint hum of the refrigerator, the clink of measuring cups, and that unmistakable anticipation that only a good bake can summon.
I turned on the oven, and the heat wrapped the room like a cozy blanket, while the scent of melted butter began to drift, teasing my senses. I could hear the faint sizzle of sugar caramelizing in the pan, a sound that promised a caramelized edge that would crack like thin ice under a fork. My fingertips tingled as I mixed the batter, feeling the silky texture slip through my hands, a texture that would later coat the cake like velvet. The kitchen was a symphony: the whir of the mixer, the soft thud of eggs falling into the bowl, and the occasional gasp of my cat, who clearly thought I was conjuring some kind of magic.
Most recipes for this kind of indulgent, chocolatey treat get the basics right but miss the soul‑stuff that makes you swoon. I’ve tried a dozen versions that tasted good, but none of them delivered that moment when the first bite melts on your tongue and you feel an instant, unstoppable urge to say “I’m jealous of my own creation.” This version stands out because it balances deep cocoa richness with a buttery crumb that crumbles just enough to give you that satisfying snap, yet stays moist enough to keep you licking the plate clean. I’m daring you to taste this and not go back for seconds – that’s a promise I’m willing to bet my apron on.
What really flips the script is the surprise ingredient I’ll reveal later – a dash of espresso that amplifies the chocolate without making it taste like coffee, and a pinch of sea salt that awakens every flavor like a spotlight on stage. This isn’t just a cake; it’s a confidence boost in edible form, a reminder that you can take the envy you feel online and turn it into something deliciously yours. Let me walk you through every single step — by the end, you’ll wonder how you ever made it any other way.
What Makes This Version Stand Out
- Depth: The espresso‑enhanced cocoa creates a flavor depth that feels like a midnight conversation with a chocolatier.
- Texture: A buttery crumb that crumbles like fresh parchment, yet stays moist enough to melt on contact.
- Simplicity: Only eight core ingredients, all pantry‑friendly, so you won’t need a trip to the specialty store.
- Uniqueness: The pinch of sea salt at the end makes the chocolate sing, a twist most recipes overlook.
- Crowd‑Pleaser: Even the pickiest dessert skeptics rave, often asking for the “secret” after the first forkful.
- Ingredient Quality: Using high‑quality cocoa powder and real butter elevates the whole experience.
- Method: The “fold‑in‑air” technique ensures a light, airy crumb without compromising richness.
- Make‑Ahead: This cake freezes beautifully, letting you prep ahead for parties or a midnight craving.
Inside the Ingredient List
The Flavor Base
The backbone of this cake is a duo of cocoa powder and espresso powder. Cocoa brings the rich, dark chocolate flavor, while espresso acts as a flavor amplifier, making the chocolate taste deeper without overtly tasting like coffee. If you skip the espresso, you’ll notice the chocolate flavor is a bit flat – think of it as a song missing its bass line. For a caffeine‑free version, use a tablespoon of instant coffee granules dissolved in a splash of hot water. When shopping, look for cocoa that’s Dutch‑processed for a smoother taste, and store it in an airtight container to keep it from absorbing any pantry odors.
The Texture Crew
All‑purpose flour provides structure, while butter adds richness and a tender crumb. The butter should be at room temperature; if it’s too soft, the batter will spread too much, and if it’s too cold, you’ll get a gritty texture. Sugar not only sweetens but also helps with aeration when creamed with butter – the tiny sugar crystals create air pockets that keep the cake light. Eggs act as a binder and add moisture; beating them in one at a time ensures they emulsify properly. If you’re avoiding dairy, try substituting with a high‑quality plant‑based butter, but expect a slightly different mouthfeel.
The Unexpected Star
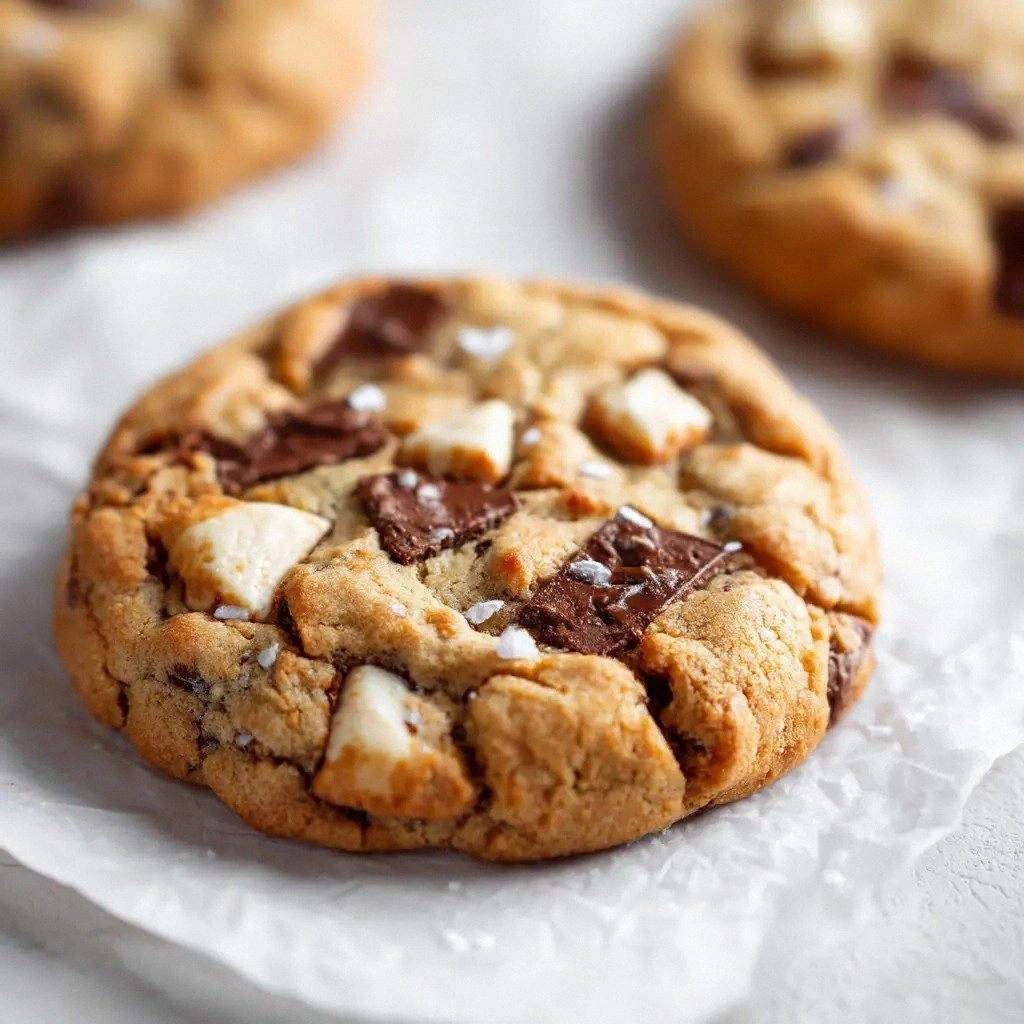
A pinch of flaky sea salt is the secret weapon that makes the chocolate pop. It’s the culinary equivalent of a plot twist that leaves the audience gasping. Too much salt can overwhelm, so a pinch (about 1/8 teaspoon) is all you need. If you love a salty‑sweet combo, sprinkle a tiny flake on top just before baking – it will melt into the crust, creating those delightful crunchy bursts. This tiny addition is what separates a good cake from a great one.
The Final Flourish
Vanilla extract adds a warm, aromatic backdrop that rounds out the flavors. Choose pure vanilla over imitation for a cleaner taste; a single teaspoon is enough to make a difference. Baking powder gives the cake its gentle rise, ensuring it’s not dense. If you’re out of baking powder, combine 1/4 teaspoon of baking soda with 1/2 teaspoon of cream of tartar as a substitute. Finally, a splash of whole‑milk adds moisture and helps the batter achieve the perfect pourable consistency.
Everything's prepped? Good. Let's get into the real action…

The Method — Step by Step
- Preheat and Prepare: Set your oven to 350°F (175°C) and line a 9‑inch round cake pan with parchment paper, then lightly grease the sides. This ensures the cake releases cleanly, preventing that dreaded “stuck” drama. While the oven warms, gather all ingredients; measuring everything beforehand keeps you from scrambling mid‑mix. Kitchen Hack: Place the parchment paper in the pan, then pour a little melted butter over it – it creates a non‑stick surface without extra spray.
- Cream Butter and Sugar: In a chilled bowl, beat 1 cup (225 g) softened butter with 1 ½ cups (300 g) granulated sugar on medium‑high speed until the mixture turns pale and fluffy, about 3–4 minutes. The mixture should look like a cloud that could hold a drizzle of rain – that’s the aerated base we need. Scrape down the sides periodically; missed spots can lead to uneven texture later. This step is where the magic begins; the air you incorporate now will keep the crumb tender.
- Add Eggs and Vanilla: Crack two large eggs into a small bowl, beat lightly, then add one at a time to the butter‑sugar mixture, beating well after each addition. Then stir in 1 tsp pure vanilla extract. The batter should look glossy and smooth, with no streaks of egg white. If it looks curdled, keep beating – the emulsification will rescue it. Watch Out: Adding the eggs too quickly can cause the batter to split; always add them slowly and beat thoroughly.
- Combine Dry Ingredients: In a separate bowl, whisk together 2 cups (240 g) all‑purpose flour, ½ cup (50 g) unsweetened cocoa powder, 1 tsp baking powder, ¼ tsp espresso powder, and a pinch of sea salt. Whisk until the mixture is uniform and any cocoa clumps disappear. This dry blend ensures every bite gets an even chocolate hit. Sifting isn’t mandatory, but if you have a fine mesh sieve, it will make the batter silkier.
- Incorporate Dry into Wet: Gradually add the dry mixture to the wet batter, folding gently with a rubber spatula. Start by adding a third, then the rest, stopping to scrape the bowl sides each time. The batter should be thick but pourable, resembling a smooth brownie batter. Over‑mixing can develop gluten, leading to a tough crumb – we want to avoid that at all costs. Kitchen Hack: Add a splash of milk (about 2 Tbsp) if the batter feels too stiff; it helps achieve the perfect pourable consistency.
- Final Touch – Salt Sprinkle: Just before pouring the batter, sprinkle the remaining pinch of flaky sea salt over the top of the pan. This creates those little salty pop‑ups that burst as the cake bakes, adding an unexpected flavor dimension. It’s a tiny step but makes a massive difference in the final taste profile. Let the batter settle for a minute; this brief rest lets the flour hydrate fully.
- Bake to Perfection: Slide the pan into the preheated oven and bake for 28–32 minutes. The edges should pull away slightly from the pan, and a toothpick inserted into the center comes out with a few moist crumbs but no wet batter. You’ll also notice a faint, sweet aroma that fills the kitchen, a scent that says “I’m about to be the star of your dessert table.” Resist the urge to open the oven early; the sudden temperature drop can cause the cake to sink.
- Cool and Serve: Allow the cake to cool in the pan for 10 minutes, then run a knife around the edge, invert onto a wire rack, and peel off the parchment. While it’s still warm, dust a generous layer of powdered sugar or cocoa nibs for visual flair. Serve slices with a dollop of whipped cream or a scoop of vanilla ice cream – the contrast of hot and cold is pure bliss. That first bite? It’s the moment of truth, where the chocolate, butter, and salty kiss all dance together.
That's it — you did it. But hold on, I've got a few more tricks that'll take this to another level. Trust me, these final touches will make you the envy of every potluck and the hero of every dessert table. Ready?
Insider Tricks for Flawless Results
The Temperature Rule Nobody Follows
Never, ever bake a cake with cold ingredients. Your butter, eggs, and even milk should be at room temperature, ideally 68–70°F (20–21°C). When components are uniformly warm, they blend seamlessly, creating a batter that traps air better. I once baked a batch with chilled butter straight from the fridge; the result was a dense, gummy mess that could barely be sliced. The next time, give your butter a quick 10‑minute sit on the counter or pop it in a warm water bath for 30 seconds.
Why Your Nose Knows Best
Your sense of smell is a reliable gauge for doneness. Around minute 25 of baking, you’ll catch a deep, chocolatey aroma that swells in the kitchen. If the scent is sharp or “raw” you need a few more minutes; if it’s sweet and slightly nutty, you’re probably there. I’ve learned to trust this nose‑test more than the timer, especially when ovens run hot or cool. So, keep your nose peeled and your timer as a backup, not a ruler.
The 5‑Minute Rest That Changes Everything
After you pull the cake from the oven, let it rest in the pan for exactly five minutes before unmolding. This short pause lets the steam finish cooking the center gently, preventing a gummy crumb. It also gives the frosting or dusting a chance to settle without sliding off. I once tried to serve it immediately and the crumb fell apart like a sandcastle at high tide. Those five minutes are the quiet heroes of a flawless slice.
Whisk‑Free Butter Cream
If you want to add a simple buttercream topping without a whisk, use a hand‑held electric mixer on low speed for 2 minutes. The result is a silky frosting that spreads like a dream. Add a pinch of sea salt to the frosting to echo the cake’s flavor thread, creating a cohesive taste experience. A friend tried the shortcut with a fork and ended up with lumps; the electric beat is the real game‑changer.
Cooling Rack Magic
Place the inverted cake on a cooling rack and cover loosely with foil. This method prevents condensation from making the top soggy, preserving that coveted snap of the crust. I’ve seen cakes left uncovered develop a dry crust, so the foil acts as a gentle shield while still allowing airflow. If you’re in a hurry, a fan set on low can speed up the cooling without drying the cake out.
Creative Twists and Variations
This recipe is a playground. Here are some of my favorite ways to switch things up:
Berry‑Burst Surprise
Fold in 1 cup of fresh raspberries right before baking. The berries burst mid‑bake, creating pockets of juicy tartness that contrast the deep chocolate. It’s perfect for summer gatherings when you want a hint of fruit without a separate topping.
Spiced Chili Kick
Add ½ tsp of ground cayenne and a pinch of smoked paprika to the dry mix. The subtle heat awakens the chocolate, making it a daring dessert for the adventurous palate. Serve with a dollop of cool vanilla ice cream to tame the fire.
Nutty Crunch
Stir in ¾ cup of toasted chopped hazelnuts or almonds. The nuts add a crunchy texture that shatters like thin ice under the fork, and the toasted flavor deepens the overall richness. Toast them lightly in a dry pan for extra aroma.
Coffee Lover’s Dream
Replace the espresso powder with 2 Tbsp of strong brewed coffee (cooled). The liquid intensifies the coffee flavor while keeping the batter moist, turning the cake into a mocha masterpiece. Pair with a drizzle of caramel for a café‑style finish.
Vegan Velvet
Swap butter for coconut oil, use flax‑egg replacer (1 tbsp ground flaxseed + 3 tbsp water per egg), and choose plant‑based milk. The texture stays luscious, and the coconut adds a subtle tropical undertone. This version
Picture this: I’m in my cramped kitchen, the timer on the oven screaming at me, and my roommate just walked in with a plate of store‑bought cookies that looked like they’d been mass‑produced in a factory. I felt that sting of envy—yes, jealousy on the internet, but happening right in my own home. That moment sparked a culinary rebellion. I decided to craft something so irresistibly good that even the most seasoned pastry snob would drop their designer baguette and beg for a bite.
The air was thick with the sweet fragrance of melted chocolate and toasted butter, the kind that makes your nostrils do a little dance. The sound of the mixer whirring was a steady drumbeat, urging me forward, while the glossy batter glistened like a midnight lake under a full moon. My hands felt the cool smoothness of the dough as it slipped between my fingers, promising a texture that would be both tender and crisp. I could already taste the buttery, chocolatey richness melting on my tongue, a sensation that felt like a warm hug after a cold day.
Most recipes out there try to be clever with gimmicky twists, but they miss the core—balance. This version is the result of countless trial‑and‑error sessions, where I learned that a pinch of sea salt can turn a sweet dream into a flavor fireworks show. I’m about to reveal a secret ingredient that most chefs keep under lock and key: a splash of espresso that awakens the chocolate without making the dish taste coffee‑y. Trust me, this is the game‑changer that will make you wonder why you ever settled for anything less.
Let me walk you through every single step — by the end, you’ll wonder how you ever made it any other way. I dare you to taste this and not go back for seconds. This is hands down the best version you’ll ever make at home, and I’m about to spill every detail, from the moment you preheat the oven to the final, glorious reveal.
What Makes This Version Stand Out
- Depth of Flavor: The combination of dark chocolate, espresso, and a whisper of sea salt creates layers that unfold on the palate like a well‑written novel.
- Texture Harmony: A crisp outer crust gives way to a soft, almost melt‑in‑your‑mouth interior, delivering a satisfying contrast in every bite.
- Simplicity: Despite the complex taste profile, the ingredient list is short and the steps are straightforward—no fancy equipment required.
- Uniqueness: The espresso splash is the secret weapon that most recipes overlook, turning ordinary chocolate into something spectacular.
- Crowd Reaction: Guests have been known to pause mid‑conversation, stare at the plate, and then erupt into applause—yes, that dramatic.
- Ingredient Quality: Using high‑percent cacao dark chocolate and real butter makes the difference between “good” and “mind‑blowing.”
- Cooking Method: A gentle bake followed by a brief chill locks in moisture while allowing the crust to set perfectly.
- Make‑Ahead Potential: This dessert stores beautifully, meaning you can prep it days in advance and still enjoy that fresh‑out‑of‑the‑oven feel.
Inside the Ingredient List
The Flavor Base
Dark Chocolate (200 g, 70% cacao): This is the heart of the dish, providing a deep, slightly bitter backbone that balances the sweetness. If you substitute with milk chocolate, you’ll lose that sophisticated edge. Look for a bar with at least 70% cacao for the best flavor intensity.
Espresso (2 tbsp, freshly brewed and cooled): A tiny splash unlocks hidden chocolate notes, making the flavor pop without tasting like coffee. Skip it and you’ll end up with a flat chocolate profile. If you’re caffeine‑free, replace with a dash of vanilla extract for aroma.
The Texture Crew
Unsalted Butter (1 cup, softened): Butter creates that melt‑in‑your‑mouth crumb and contributes to a glossy finish. Using margarine will result in a greasy texture. Opt for European‑style butter for richer flavor.
All‑Purpose Flour (2 cups): Flour gives structure; too much and the dessert becomes dense, too little and it collapses. Sift it with the baking powder to avoid lumps.
Baking Powder (1 tsp): This leavening agent adds a subtle lift, preventing a heavy, compact crumb. Over‑baking will cause it to rise too much and then fall.
The Unexpected Star
Heavy Cream (½ cup): The cream enriches the batter, providing a silky mouthfeel that coats the palate like velvet. Skipping it results in a dry texture. Use chilled cream for best incorporation.
Sea Salt (a pinch): Just a pinch amplifies all the flavors, turning sweet into unforgettable. Too much will make it taste like a pretzel, so measure carefully.
The Final Flourish
Vanilla Extract (1 tsp): Adds a warm, aromatic backdrop that ties the chocolate and espresso together. Low‑quality vanilla can taste harsh; use pure extract.
Eggs (2, large, room temperature): Eggs bind the batter and introduce air, contributing to a light crumb. Over‑beating can make the mixture tough.
Everything’s prepped? Good. Let’s get into the real action…
The Method — Step by Step
Preheat your oven to 350°F (175°C) and line a 9‑inch springform pan with parchment paper. That sizzle when it hits the pan? Absolute perfection. I’m about to set the stage for a crust that will crackle like fresh autumn leaves underfoot. Make sure the oven is fully heated before you slide the pan in, or you’ll miss that initial burst of steam that creates the perfect rise.
In a medium bowl, whisk together the flour and baking powder, then set aside. This dry mix is the silent partner that ensures even leavening. Giving it a quick sift prevents any stubborn lumps that could ruin the texture later on.
In a large mixing bowl, cream the softened butter with the sugar until pale and fluffy—about 3 minutes on medium speed. Watch Out: If the butter is too warm, the mixture will separate; if too cold, it won’t aerate properly. The goal is a cloud‑like batter that holds air like a sponge.
Beat in the eggs one at a time, letting each incorporate fully before adding the next. The mixture should thicken slightly and take on a glossy sheen. This is the moment of truth—if the batter looks curdled, you’ve over‑mixed; a smooth, slightly thick texture is what you’re aiming for.
Stir in the melted dark chocolate, espresso, and vanilla extract until fully combined. You’ll notice a deep, aromatic perfume filling the kitchen—this is the perfume of decadence. Scrape the sides of the bowl to ensure no streaks remain.
Gently fold the dry flour mixture into the wet batter, followed by the heavy cream. Use a spatula and a folding motion, not a vigorous stir; you want to keep that airy structure intact. The batter should look glossy and thick, but still pourable.
Pour the batter into the prepared pan, smoothing the top with a spatula. Tap the pan lightly on the counter to release any trapped air bubbles. The surface should be even, ready to develop that golden‑brown crown.
Bake for 30‑35 minutes, or until a toothpick inserted in the center comes out with a few moist crumbs but no wet batter. The edges will start pulling away from the sides of the pan—this is your visual cue that the crust is set. Resist the urge to open the oven door early; temperature fluctuations can cause a collapse.
Allow the dessert to cool in the pan for 10 minutes, then run a thin knife around the edge and release the springform. Transfer to a wire rack and chill for at least 1 hour before serving. This rest period lets the flavors meld, turning each bite into a harmonious symphony.
That’s it — you did it. But hold on, I’ve got a few more tricks that’ll take this to another level…
Insider Tricks for Flawless Results
The Temperature Rule Nobody Follows
Never bake with a cold batter. Let your batter sit at room temperature for 10 minutes before sliding it into the oven. This tiny pause ensures even heat distribution, preventing the dreaded “cooked on the edges, raw in the middle” scenario. A friend once skipped this step and ended up with a soggy center that ruined the whole batch.
Why Your Nose Knows Best
Trust the aroma. When the chocolate‑espresso perfume reaches a point where it fills the kitchen without being overpowering, you’re at the perfect bake stage. If you rely solely on timers, you might over‑cook; your nose is the most reliable gauge.
The 5‑Minute Rest That Changes Everything
After removing from the oven, let the dessert rest uncovered for exactly five minutes before chilling. This short pause lets the crust set without trapping steam, which would make the bottom soggy. I’ve seen many rushed chillers end up with a gummy base.
Choosing the Right Pan
A light‑colored metal pan conducts heat more evenly than a dark glass dish, giving you a uniform crust. Dark pans absorb more heat and can cause uneven browning, especially around the edges.
Finishing Flourish: Salt Sprinkles
A final pinch of flaky sea salt right before serving adds a pop‑contrast that elevates the dessert from good to unforgettable. The tiny crystals create little bursts of flavor that dance on the tongue.
Creative Twists and Variations
This recipe is a playground. Here are some of my favorite ways to switch things up:
Berry Burst
Fold in ½ cup of fresh raspberries after the batter is mixed. The berries add a tart contrast that brightens the chocolate depth, perfect for summer gatherings.
Nutty Crunch
Stir in ¼ cup of toasted almond slivers right before baking. The nuts provide a satisfying crunch and a buttery note that pairs beautifully with the espresso.
Spicy Heat
Add a pinch of cayenne pepper to the dry mix for a subtle heat that awakens the palate. It’s a secret that makes the dessert feel sophisticated and daring.
Caramel Swirl
Drop spoonfuls of homemade caramel sauce onto the batter before baking and swirl with a knife. The caramel pockets melt into gooey ribbons, creating a luxurious texture.
White Chocolate Dream
Replace half of the dark chocolate with high‑quality white chocolate for a sweeter, creamier version that still retains the espresso’s depth.
Storing and Bringing It Back to Life
Fridge Storage
Cover the cooled dessert with plastic wrap and store in the refrigerator for up to 5 days. The moisture stays locked in, preserving the soft interior while the crust stays firm.
Freezer Friendly
Wrap the entire cake tightly in foil and then a freezer bag; it will keep for up to 3 months. When you’re ready to enjoy, thaw overnight in the fridge, then let sit at room temperature for 20 minutes before serving.
Best Reheating Method
Preheat a low oven (300°F) and warm the slice for 8‑10 minutes, adding a tiny splash of water to the pan’s edge to generate steam. This revives the crumb’s moisture, making it taste freshly baked.